Selection Modes

1. Selection Modes
Set the Sub Object Level or Mode. "Select Shell" can be stored by Selection Mode, if enabled in PolyUnwrapper Settings.
Ctrl + Click: will convert the selection in the current to the new selected one.
2. Expand Selection by Material ID
Expand the current selected faces to all the faces of the same model sharing the Material ID. It works with multiple material IDs.
Shift + Click: Expand to the faces of all models sharing the same Material ID.
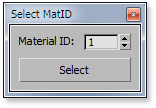
Right Click: Open a dialog to select faces by Material ID.
3. Expand Selection to UV Shell
Expand the current selection to their Shell. It works in all selection modes.
4. Grow Selection
Grow the UV selection.
Ctrl + Click: Grow Geometry selection.
5. Loop Selection
Loop the selected UV Edges.
Ctrl + Click: Loop the selected Geometry Edges.
6. Paint Selection Mode
Enable/Disable Paint Selection Mode
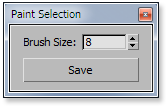
Right Click: Open a dialog to setup the Brush size.
7. Texture Preview
Allows you to apply a temporary Checker Map material to the models. You can cycle between a maximum of 7 Checker Maps.
Right Click: Restore the model's material.
Three custom 512x512 Checker Maps are shipped with PolyUnwrapper, but you can replace them with your own textures if you need to.
8. Expand Selection by Smooth Group
Expand the current selected faces to all the faces of the same model sharing their Smooth Group.
Ctrl + Click: Uses strict Smoothing Groups to expand the selection. Faces having more than one Smoothing Group, for example 3 and 8, will only expand to those other faces that strictly uses this two SG, but not to faces using only 3 or 8 SG.
9. Expand Selection to Model Element
Expand the current selection to the Model Element.
Shift + Click: Expand the selection to the whole model.
10. Shrink Selection
Shrink the UV selection.
Ctrl + Click: Shrink Geometry selection.
11. Ring Selection
Ring the selected UV Edges.
Ctrl + Click: Ring the selected Geometry Edges.
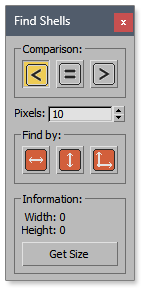
12. Find UV Shells by Size
Find UV Shell by Width, Height or Width and Height, smaller, equal or greater than the specified value.