QuadSphere v2.2.0
QuadSphere is an Object Plugin that creates spheres made of quads, which are useful for low polygon modeling and mesh subdivision.
Unlike TurboSmooth, with QuadSphere you can specify a level of subdivisions that is not power of 2. Another advantage is that the areas of the faces are more evenly distributed than using a Box with TurboSmooth.
Additionally you can unify the Materials IDs, create hemispheres with or without caps, and convert the object to poly with a single click.
Install
Delete any previous version of QuadSphere you have installed.
Extract the .zip file, copy the .mse file to your "3ds Max\Plugins\" folder, and restart 3ds Max.
If you have no access to the plugins folder or whant to have the plugin in another folder then in the 3ds Max menu go to:
Customize -> Configure System Paths -> 3rd Party Plug-Ins
There you can add the folder where you have copied the plugin .mse file. Remember to restart 3ds Max.
Supported 3ds Max versions
2016 - 2027
Creation Method
There are 2 methods for creating the QuadSphere, Edge and Center.
Edge: The QuadSphere is created in the center of the first and second mouse click, so what you actually define is its diameter rather than the radius.
Center: The QuadSphere is created centered on the first click and you specify the radius with the second mouse click.
Properties
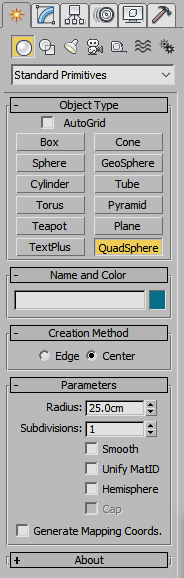 |
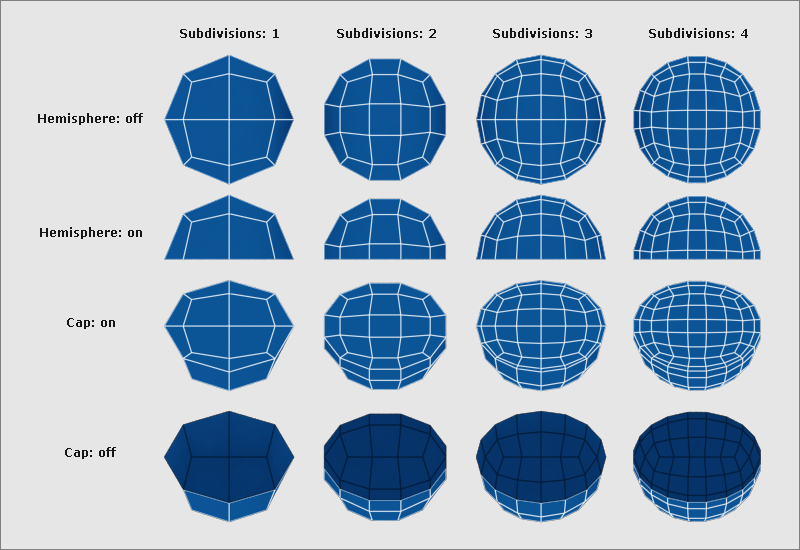
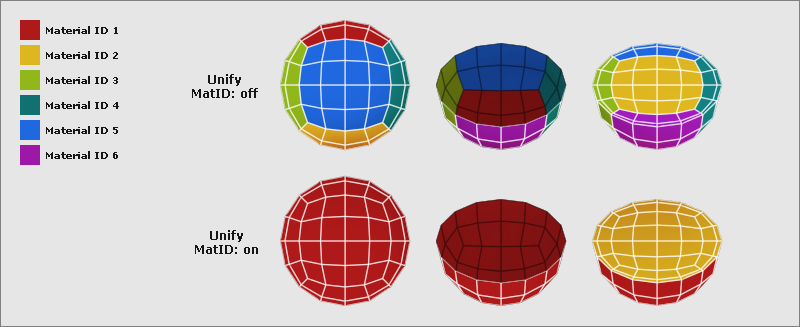
Radius: Is the radius of the sphere. (default:25) Subdivisions: Is the number the faces will be subdivided in each axis X, Y and Z. The maximum number of subdivisions is 64. (default:1) Smooth: If it's on, Smoothing Group 1 will be applied to the whole sphere. If Hemisphere and Cap are turned on, then Smoothing Group 1 will be assigned to the Hemisphere and Smoothing Group 2 to the Cap. By default, the Smoothing Groups are applied by polygon. (default:off) Unify MatID: By default, Materials IDs are assigned as they are in a cube, so there are 6 groups of Materials IDs. If Unify MatID is turned on, one Material ID is assigned to the whole sphere. If Hemisphere and Cap are turned on then Material ID 1 is assigned to the Hemisphere and Material ID 2 is assigned to the Cap. (default:off) Hemisphere: If it's on, only the half top part of the sphere is created. (default:off) Cap: If it's on, the Hemisphere will be caped. Cap is only available if Hemisphere is on. (default:off) Generate Mapping Coords: If it's on, the default box uv mapping will be generated. (default:off) |
Creating and Modifying QuadSpheres
You can create and modify QuadSpheres from the 3ds Max Listener or from a Script.
To create a QuadSphere you can type quadsphere() in the Listener and it will create a sphere with the default radius(25) and default subdivisions(1) at position [0,0,0]
Additionally you can create a QuadSphere with some different parameters as follow:
| QuadSphere radius:50 subdivisions:8 smooth:false matid:false hemisphere:true cap:true mapping:false |
This will create a QuadSphere with a radius of 50 units, 8 subdivisions, hemisphere and cap on.
History
Version 2.2.0
+ NEW Added support for 3ds Max 2026
- Fixed bug in Hemisphere/Cap
- Fixed bug in Unify Materials IDs
- Improved performance up to 300%
Version 2.1.0
- Improved performance
Version 2.0.0
+ New by polygon smoothing group by default
+ New option to turn UV mapping on/off
+ Improved creation and update performance, up to 45X faster
+ Improved sphere algorithm
+ Increased maximum subdivisions to 64
+ Moved the plugin to the "Standard Primitives" menu for easy accessibility
+ Creation Method rollout is now not visible in Modify mode
+ Removed all global dependencies
+ Removed "Convert to Poly" option
- Dropped support for 3ds Max 2009-2015
Version 1.0.0
- Initial release